The next phase of the condenser is to make the water jacket.
This afternoon I went to three different DIY shops (Hardware stores for the US readers) looking for 3 inch plastic pipe and end caps. The pipe was easy, its used for drain pipe on guttering. The end caps were impossible; who would want to seal a drain pipe!?!
So the solution I have come up with is to use slightly narrower pipe (I have had to tighten the coil I made yesterday) and use part of a sink "U" bend plastic molding for caps.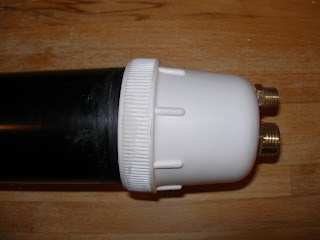
I have drilled and fitted brass connectors in one end cap (this will be the bottom end where the cold water feeds in and the liquid Methanol drains out of the coil) and one fitting in the other (top) for the water to exit again. Near the top of the pipe I have drilled a hole for the top of the coil to exit and attached a fitting there to connect to the processor. The caps are jointed to the pipe body with "no more nails" adhesive. If that fails I have some "plumber's mate" that sets on contact with water....
Showing posts with label Methanol Condenser. Show all posts
Showing posts with label Methanol Condenser. Show all posts
Saturday, 3 March 2007
Condenser assembley.

Friday, 2 March 2007
Its bending time!
So last night I decided to make something; - the coil for the methanol condenser.
The goal is to make a small coil of pipe to go inside a water jacket. The vapourised methanol gas goes in the top and condenses as it goes through. At the other end now liquid methanol is piped back into the can to be reused.
I have seen various condensers on the web, most seem to be very long and thin. One stood out by virtue of its shortness. The maker had coiled the pipe inside the water jacket, increasing the surface area (ie more efficient) and also reducing the height.
The goal is to make a small coil of pipe to go inside a water jacket. The vapourised methanol gas goes in the top and condenses as it goes through. At the other end now liquid methanol is piped back into the can to be reused.
I have seen various condensers on the web, most seem to be very long and thin. One stood out by virtue of its shortness. The maker had coiled the pipe inside the water jacket, increasing the surface area (ie more efficient) and also reducing the height.
So, I obtained some 8mm copper pipe and a couple of end caps from a friendly local plumbing shop and filled it with very fine sand (which I had dried in the oven for 30 mins to make it easier to put in the pipe). The problem with copper pipe is that it pinches when bent. (think of a piece of hose pipe when folded) To get round this, plumbers use a spring inserted into the pipe to ensure the round profile is maintained as its bent.
 The spring can then be twisted to shrink and release form the now bent pipe. the problem is that the coil I need is lots and lots of bends (the more bends, the harder to remove the spring), all one after another, plus the length of pipe I need (about 2 meters/6 feet) is too long to get a spring into and then back out of.
The solution is to use the old fashion way of pipe bending - fill it with sand and cap off at both ends (to stop the sand being pushed out by the bending force).
Once filled with sand, I found a highly engineered device to bend my pipe around - a can of windscreen de-icer! the diameter was about 2 1/2", just right for the 3" plastic pipe in am aiming to use for the water jacket.

Once bent to shape its time to remove the sand....
Removing the top and bottom end caps allows some of it out but the rest is compacted in pretty tightly. a gentle tap with a metallic object was enough to encourage some more of it out but in the end a swift rotating hand action (as you would do to get a yard of ale going - sorry for those of you who haven't been to an English pub for murky dish water drinking activities ;-) ). Out came the sand and I was left with an aesthetically pleasing piece of plumbing. Its a shame its going to go inside a plastic pipe and never be seen again!

Subscribe to:
Posts (Atom)

